For Nintendo diehards, the Nintendo Switch is the best of both worlds: You get the power and library of a full-fledged console with the portability of a Gameboy Color. With modern gaming steering further away from physical copies of games, your Switch’s connection to a wireless network is more important than ever.
Whether you’re breaking monster parts with your friends in Monster Hunter: Rise or a grizzled veteran just trying to download Super Mario Bros 3, your gaming experience hinges on how well your console can connect to your home network. If your downloads take longer than they should or your multiplayer games lack stability, follow these tips to get back to the game.
Connect to Another Network
If you’re not sure your home wireless network is the problem, try connecting to a different one. Ideally, you should connect to a private home network instead of a public one, like you may find at a coffee shop. If anything else, using your phone as a wireless hotspot also works.
Regardless of the extra network, your home network — not your Switch — is likely the problem if your Switch connects without issue.
Use the Right Frequency
Modern home Wi-Fi comes in two main frequencies: 5 GHz and 2.4 GHz. The 2.4 GHz frequency is the older of the pair, meaning more devices, including your Joy-Cons, smartphone, and Bluetooth toys, use it. With all that traffic, the 2.4 GHz band gets busy quickly, and devices may start to talk over each other. You don’t need oodles of bandwidth for stable online gaming, but you do need some.
Think of the 5 GHz band like the carpool lane. The cars in the carpool lane can reach their destinations faster, just like 5 GHz–capable wireless devices can transmit information rapidly across that band. If you find your gaming habits curbed by spotty multiplayer stability, then connecting your Switch to the 5 GHz band can help speed up and stabilize your connection. For the record, this works with every device on your network.
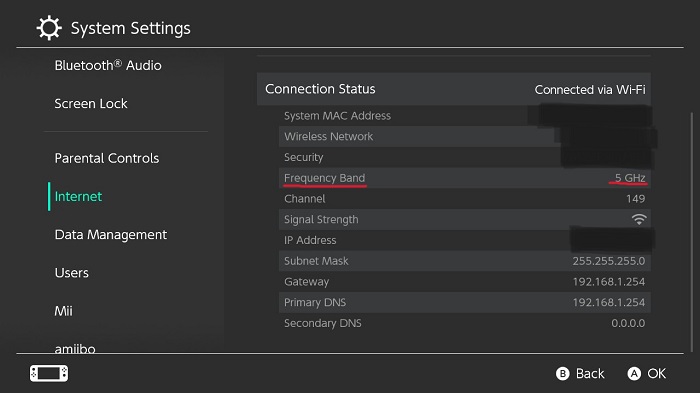
Here’s how to check which frequency your router is using:
- Go to System Settings.
- Select “Internet,” and you should see an information chart of your network under “Connection Status” with “Frequency Band” on the fourth row.

Check Your Router Placement
Proper router placement is imperative for the performance of every device on your network. The 2.4 GHz band is known for piercing furniture and walls more reliably than the 5 GHz, neither excels at it. Reducing the number and thickness of obstacles between your wireless router and your Nintendo Switch can help stabilize a wonky connection.
The easiest way to remove obstacles from your router’s path is to place it up high and as near the center of your home as possible. Since no interior decorator wants to work around a router bolted to the ceiling and no one wants to trip over power cords and coaxial cables, it doesn’t need to be in the exact center of your home.
Get a Wi-Fi Repeater or Mesh Network

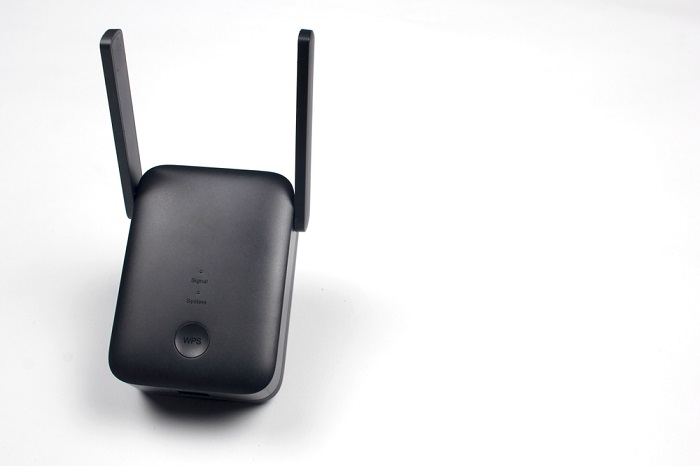
Sometimes it’s more difficult — or even impossible — to place your router in an ideal position in your home. In those instances, a Wi-Fi repeater can help alleviate any connection issues, allowing you to comfortably play all your new favorites and Nintendo classics from anywhere in your house. Using a Wi-Fi repeater is one of the easiest ways to rectify a slow wireless connection.
A Wi-Fi repeater rebroadcasts the wireless signal from your router from a second location using a second network name, mitigating the performance loss from pesky things like walls, plumbing, and the couch.
A mesh network serves the same function as a Wi-Fi repeater or extender, but it performs that function slightly differently. Instead of receiving and rebroadcasting an original wireless signal like a repeater does, a mesh network creates a single wireless network with multiple access points throughout the home. That means instead of jumping between two different networks, like you may have to with a repeater, you can seamlessly use your Wi-Fi-connected devices anywhere in your home and wander at your leisure.
Hardwire With Ethernet
Wireless internet pulls ahead in terms of convenience, but a hardwired connection blows wireless out of the water in terms of speed and stability. If you’ve tried everything else and your Switch is still slower than a bale of turtles trekking through peanut butter, you may have to connect your console to your modem using an Ethernet cable. Not all Ethernet cables or ports are created equal, but all of them are faster and more stable than Wi-Fi. If you have speedy fiber-optic or cable internet, make sure you find an Ethernet cable that lets you use all that speed you’re paying for.
If you opt to connect your Switch to your network via an Ethernet cable, you’ll have to purchase an aftermarket dock or adapter since the Switch doesn’t have any Ethernet ports of its own. It’s a universal truth that connecting a console with an Ethernet cable is the best connection for online gaming.
Increase the MTU
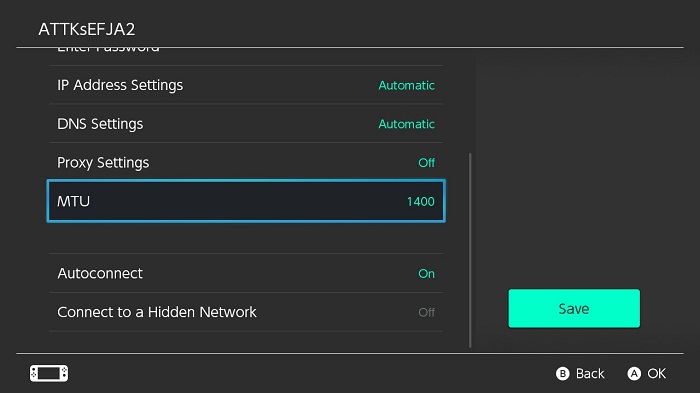
Internet-capable devices download data in packets. The larger the packet, the faster your internet connection. Increasing your Switch’s maximum transfer unit (MTU) increases the size of the data packets your Switch can work with. The larger the packet, the more data can transfer in a single ping, meaning it takes less time for data to transmit from one device to another.
Here’s how to change the MTU:
- Go to System Settings.
- Select “Internet” and then “Internet Settings.”
- Select your connected network and choose “Change Settings.”
- Scroll down until you see “MTU.” Change the number as you see fit.

Change the Channel
Routers, like walkie-talkies, CB radios, and radio stations, operate on multiple channels. Each Wi-Fi frequency has its own number of channels: 2.4 GHz Wi-Fi generally occupies up to 14 channels, while 5 GHz Wi-Fi can have over 150.
Using a Wi-Fi scanner app on your phone, you can monitor your network traffic to see which Wi-Fi channels are getting bogged down. Once you know which Wi-Fi channels carry the most traffic, you can relegate your Switch to one of the least-populated channels.

